search site

Tel - 540.322.1402

info@tomrothenberg.com

Tom's Portfolio

Tom's iBooks

destination iceland - Tom Rothenberg

social
get in touch

member of


my portfolios
follow me

destination iceland - Tom Rothenberg

member of 


FEATURED VENDOR
Spotsylvania, Virginia Photographers
Directory at Decidio.com
Monday
Jan252010

portrait retouch


Retouching has gotten a lot of press lately with all crazy stuff on the covers of your favorite entertainment magazines.  You know the ones where a celebrities head will be on someone else’s body.  In fact the word “Photoshopped” is in nearly everyone’s vocabulary and usually has a negative or artificial meaning.  That kind of bothers me, but I understand why some may think in those terms.  But those examples of body snatching are not a true example of a portrait retouch.

So why do we retouch?

Well it’s pretty obvious and you already know I am sure.  People want to look their best and as photographers we share that desire.  The problem occurs when we point that very-high megapixel still camera and press the shutter.  It is unfair really.  We are all beautiful and all so very imperfect.  However, we tend to look at photographs differently than how we look at others in person.  You would never to go up to someone, inches from their face, and study their characteristics and imperfections.  But in a still image we have an opportunity to dissect and study that moment in time.  Not seeing people as they really are.  That is the unfair part.

Say someone had a small blemish one day.  In person you may not even notice cause it isn't important and probably not even visible to you. But in a high resolution photograph it might take a life of it’s own. 

Another scenario is that people have bad days.  Maybe that day they have a pimple, red eyes or even cut themselves shaving that morning.  Again, not how we see them in real life.  Or maybe it's even the fault of the photographer by not capturing a good angle or ensuring flattering light. 

The level of a retouch is totally a subjective thing.  In fashion and marketing we tend to go over the top and try to make perfect looking humans. I have never met any of those perfect humans in real life. Wonder where they hang out?

But in general portraiture it is typically something less than the “china doll” look.  How much, how little?  Just depends on the client, style and the desired effect. 

So next time you hear someone say that was “Photoshopped”, I hope you consider all the possible reasons one would retouch.

before

Special note to photographers/retouchers 

If you do any major retouching, only show the clients the edited version.  Nobody wants to see how bad they looked in the original image.  Seeing a major retouch before/after only magnifies what you did and can make someone feel like crap. 

retouched by Tom Rothenberg


Saturday
Jan232010

Monticello

I was in Charlottesville today so I took a quick trip over to one of my favorite American's home.  Yep, Thomas Jefferson. It wasn't really a photography trip but I did get a chance to capture a few images. It was a mild day and the sun was out by noon.  The grounds are beautiful and there is so much to learn.

photo by Tom Rothenberg

photo by Tom Rothenberg

It is amazing how much Thomas Jefferson accomplished in his lifetime.

If you are ever near the Charlottesville, VA area, I encourage you to stop by Monticello for a visit.  Of course, you also want to see the Jefferson Memorial in Washington DC.


photo by Tom Rothenberg


Friday
Jan222010

using Automator to export files from Lightroom and import to iPhoto

Automator is one of the coolest parts of OSX.  It enables us to create complicated workflows and automate tasks.  Think of Automator as a ‘recipe’ to get something done.  Using a simple, visual interface - you build a step-by-step process by picking common tasks from a list and stacking them in a predictable manner. These can be a single action program to a multi-step sequence that performs a very comprehensive set of instructions

I believe the average Mac user doesn't dabble much in Automator because we don’t need to.  The operating system provides much of everything we need.  But where Automator shines is being able to automate workflows for application specific tasks.

Maybe you have the need to target a bunch of documents, convert them to pdf’s, copy them to a back-up drive and email them to someone else.  You could create the steps in Automator and run the workflow whenever you want.  With one click - it can do all of those steps automatically. Once you build it, its a tool ready to be used at any time.

Let's try an easy one 

Like many photographers, I use  Adobe Photoshop Lightroom for my Raw conversions and image organization. But I also use iPhoto for an important purpose - the tight integration to other Apple devices and services.  iPhoto is the portal to iPods, iPhones, AppleTV and Mobile Me galleries.  These are very good reasons to have your Lightroom images also live in iPhoto.

So this is where automator can help. We build a simple automator application,  along with an export preset in Lightroom to do it all for us.

Step 1 - Automator

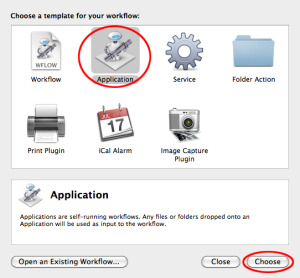
Launch Automator and choose Application from template chooser


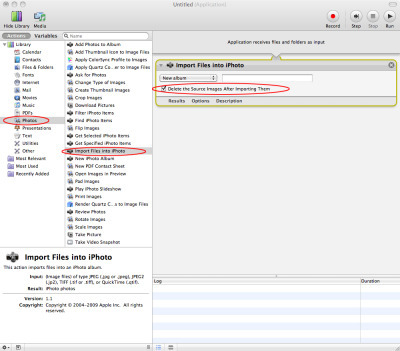
  • select Photos from the Library modules to display the image related tasks
  • double click import Files into iPhoto
  • check the delete source images after importing them  option
  • Select the File menu and save as "import to iPhoto" to your applications folder
  • Close Automator


Step 2 - Lightroom

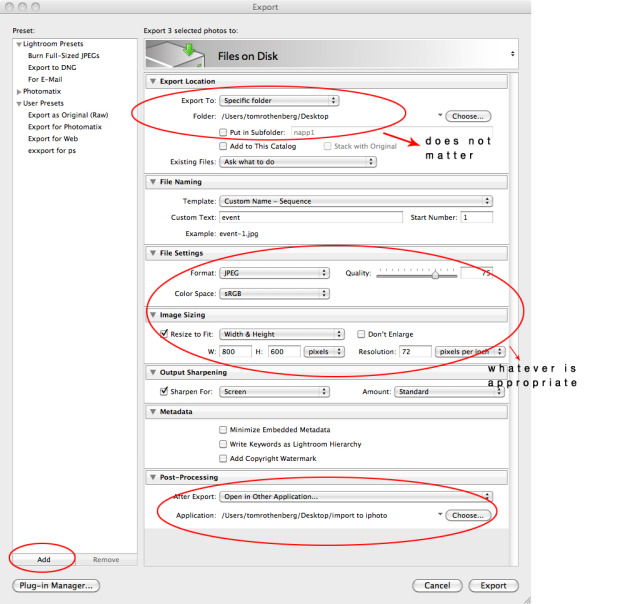
While in the library module select the Export... button.  This will open the export dialog box.

Start at the top and select the file settings of your choice.

Choose your desktop for the export to folder,  but you will soon see this part does not really matter.

But consider where the images will ultimately go from iPhoto. If it is an iPhone, you could easily down size. If it’s an AppleTV connected to a large HD TV you may want the full size file.


Now here is the trick

  • In the Post-Processing section,  select the drop down and select Open in Other Application...
  • Click the Choose button and select the “import to iPhoto” app you just saved in your Application foler
  • Once all options are set as desired,  click the Add button in the export dialog box.
  • Name it “import to iPhoto” and save.  You just created a Lightroom preset export
  • Now Cancel out of the export dialog box


Step 3 - Try it Out

Browse your catalog and select the desired image(s), choose the Export button and select the newly created preset “import to iPhoto” and click Export and watch the magic.


Your images will be exported from LR, then imported to iPhoto and the exported files on the desktop will get trashed.  

We could have created this Lightroom-to-iPhoto export preset just as easily without the automator application. However, by using it, we were able to have those files we exported to the desktop automatically deleted.

Pretty cool, right?


This is just the small taste of what Automator could bring to your workflow. Think about the tasks you routinely do and it's very likely you can build a workflow in Automator to simplify your life.  


For more information using Automator check out http://www.macosxautomation.com/automator/index.html.


Monday
Jan182010

The Digital Dental Hygienist

My wife is a Dental Hygienist.  In fact, she is about the best there is.  Her patients adore her and she makes a significant impact in their lives.  I know how they feel.

We sometimes do similar work for people regarding their smile.  But mine happens in the digital darkroom and takes far less talent.

In this week's video tutorial I demonstrate a very quick and simple Photoshop adjustment to brighten any smile.

This one's for you Allie.


Sunday
Jan172010

The HDR Interior

We have all seen it, sometimes not sure if it is a photograph or an illustration, but always having a strong reaction one way or another.  I am, of course, speaking of High Dynamic Range photography or HDR.  

 This technique is typically accomplished by shooting multiple bracketed exposures of the same shot and blending them together - known as tone mapping them back down to a single image.  This technique allows us to capture detail in the deepest of shadows and the brightest of highlights. 

 This post could go a whole different route and simply talk about the debate within the photo community about the merits of HDR vs. photo realism. For the record, I support any level of post processing, manipulation, or use of any tool for an artist to convey their message in an image.  It is really that simple.  See there, you almost got me going and this isn't my point for this post. 

 The majority of HDR shots we see are usually of beautiful landscapes. You know them when you see it and in the hands of a skilled artist, they are amazing.  But what many photographers don’t often think about is that the technique is also sweet for interiors.

 Interior shots can be very challenging.  Between shadows, bright windows and overall poor lighting conditions for photography - it can be hard to capture anything that has a chance to ever make it off your memory card. Sure, if you have the equipment, skill and time you could artificially light it.  Maybe Joe McNally will even stop by and help out.

photo by Tom Rothenberg But if not, try a simple 3 exposure HDR shot, you might be amazed.  You may need to be less heavy handed during the tone mapping as you might process for a landscape.  Or maybe not, whatever works for you.  Remember, you're the boss.

 For those who don’t know much about HDR and want to learn more, I suggest you go check out Trey Ratcliff over at his Stuck in Customs travel photography blog.  He maintains an excellent HDR tutorial and shares some of his inspiring work.  In fact, his new book “A World in HDR” made our Weekly Hot List


Have a great day everyone!

Page 1 ... 29 30 31 32 33